FisheyeRender is a 3ds max plug-in to render dome masters,
or circular fisheye images, of the scene using the current renderer. It provides an easy
and quick way to create accurate equidistant projection images in 3ds max.
The FREE version has restrictions like not being able to render multiple frames at a time.
The PRO version offers a variety of additional features and a lot of flexibility
needed in the production of fulldome movies.
The FREE version supports up to 32-bit color (8 bits each for R, G, B, and Alpha).
The PRO version also supports Z-buffer output.
Download the FREE version of FisheyeRender 1.22 for 3ds max 4 and 5 by clicking the button below.
Download the FREE version of FisheyeRender 1.22 for 3ds max 6, 7, and 8 by clicking the button below.
Download the FREE version of FisheyeRender 4.00 for 3ds max 9 and 2008 32-bit by clicking the button below.
Download the FREE version of FisheyeRender 4.00 for 3ds max 9 and 2008 64-bit by clicking the button below.
Download the FREE version of FisheyeRender 4.00 for 3ds max 2009 32-bit by clicking the button below.
Download the FREE version of FisheyeRender 4.00 for 3ds max 2009 64-bit by clicking the button below.
Download the FREE version of FisheyeRender 4.00 for 3ds max 2010 & 2011 32-bit by clicking the button below.
Download the FREE version of FisheyeRender 4.00 for 3ds max 2010 & 2011 64-bit by clicking the button below.
Download the FREE version of FisheyeRender 4.20 for 3ds max 2012 32-bit by clicking the button below.
Download the FREE version of FisheyeRender 4.20 for 3ds max 2012 64-bit by clicking the button below.
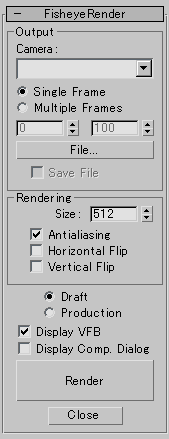
FisheyeRender Rollout
HOW TO INSTALL
1. Copy the unzipped file (FisheyeRender*.dlu)
to your max's "plugins" folder.
HOW TO START
1. Start max and select the Utilities tab
(with the "hammer" icon).
2. Click the More... button to display
the Utilities dialog.
3. Select FisheyeRender in the dialog
and click OK.
4. The FisheyeRender rollout (left)
will appear in the Utilities panel.
HOW TO USE
1. Select a camera in the Camera
list box in the FisheyeRender rollout.
If you do not select a camera or
if the camera does not exist in the scene
when rendering starts, the default
camera of the plug-in will be used.
2. If you want to save the rendered image,
click the File... button to bring up
the Output File dialog prior to rendering.
Enter a file name in the File name
edit box and click the Save button
in the dialog. Click the Save File
check box if it is unchecked.
3. Set the resolution size of the rendered
image using the Size edit box.
The rendered image is always square.
(The width and the height are the same.)
4. Click the Render button to start rendering.
OTHER PROPERTIES & CONTROLS
Single Frame: Renders the current frame only. Multiple Frames: Renders the frame range specified.
(This option is unavailable in the FREE version.) Antialiasing: Turns on antialiasing. Horizontal Flip: Flips the rendered image horizontally. Vertical Flip: Flips the rendered image vertically. Draft: Switches FisheyeRender's rendering parameters to the draft setting. Production: Switches FisheyeRender's rendering parameters to the production setting. Display VFB: Displays the rendered image in the rendered frame window (the virtual frame buffer window). Display Comp. Dialog: Displays the Rendering Completion dialog after finishing rendering. Close button: Closes all FisheyeRender's rollouts.